Posts

Showing posts with the label Big Shot

Sweet Strawberry

Image
Hello everyone - it's the end of the weekend - it's been a bit of a washout and I haven't done any crafting however I do have some cards to share with you - take a look Sweet Strawberry started life in the Spring Mini Catalogue and has now been elevated to the new Annual Catalogue. It has a matching punch so it's super easy to punch out the strawberry, leaf, stalk and flower. My card uses a bit of retired DSP plus Poppy Parade card stock. Stitched So Sweetly dies were also employed to make these little masterpieces! There is a pdf of both the Mini and Annual catalogues in my side bar. The Mini only lasts until June but if you would like a copy of the New Annual Catalogue please let me know. See you soon - J x  

Scraps of Jade

Image
 Don't you just hate it when you have loads of little scraps hanging around the place? Mine get thrown into a box never to see the light of day again! However today I decided to have a go at using some of them up.  I fished out some of the Just Jade DSP scraps and die cut them with some of my Stitched Nested Labels. It was a bit fiddly fitting some of the scraps in but I managed to get enough to arrange on a C6 card base - take a look I wanted to add some stamped images so I reached for my Butterfly Gala set - I don't use this one very often but I have a matching punch that cuts them out perfectly.  The card still looked a bit empty so I added a hand drawn frame around it and a couple of sentiments - also from the Bytterfly Gala set. That and a few enamel dots finished the card off nicely. This card will be entered into the challenge over at the  Rainbow Card Challenge Blog Thanks for stopping by today - hope to see you again soon - J xx

Clean and Simple Velum

Image
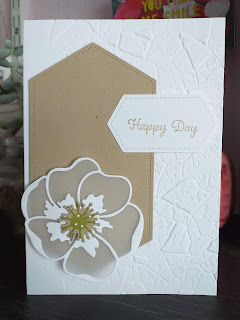
Another ancient draft and the first of three cards using my Poppy Moments dies.

Embossed Inchies

Image
Cleaning up my draft posts today and found this card made for a Facebook swap a while ago. Using various embossing folders there is also the awesome 3D Magnolia embossing folder which is carrying over into the new catalogue next week.

It's that time again!!!

Image
Yep - it's time for another  Christmas 24 challenge. This time the theme is And here is my card This is another card made from the retiring Colourful Seasons. This time I have glittered the branch and added die cut snowflakes the centres of which are adorned with an epoxy droplet. The droplets have been coloured with a dark Night Of Navy blend marker. i found a scrap of silk ribbon in my stash and my stamped snowflakes were inked with Pacific Point ink. The whole card was mounted on to a Pacific Point card base. I did a Facebook Live video on how I made this card which can be found on my page Phoenix Inspirations. Thanks for looking - see you soon - J xx

Vivaciously Violet

Image
Time for a new challenge over at the Rainbow Card Challenge Blog And this month we are looking for all things violet My card is quite clean and simple and uses one of Stampin' Up's retiring stamp sets - Colourful Seasons - take a look I started with a dark purple card base onto which I layered a piece of Whisper White card stock. The sentiment and blossom were stamped with Highland Heather ink and before I added the banner I attached my branch and die cut skeleton leaf. The banner is a piece of Whisper White card stock coloured with a Highland Heather blend pen. The card was then finished off with a Highland Heather leaf with Gorgeous Grape details. Hope everyone is staying safe and well at the moment - take care and I will see you soon - J xx

Sketch Challenge at Christmas 24

Image
Time for another Christmas 24 challenge and this time it's a sketch - take a look And here is my card This jolly snowman belongs to the set Snowman Season and is coloured in using my Stampin' Blends. The circles were die cut on the Big Shot and placed over a strip of card stock stamped with the snowflakes also from that set. You will find the challenge over at  Christmas 24 Please do pop on over and take a look at the other DT cards on show. Thanks for stopping by today - see you soon - J xx

Emerald

Image
Second challenge card of the day and this time it's for the Rainbow Card Challenge I love my greens and I had the perfect ink for this - Emerald Envy. Take a look at my card I used Lily Pad Lake and the matching dies for this card and I must admit I do like the way it has turned out. I stamped the waves directly on to the card base and then added a die circle onto which I had added the die cut waves. Around this circle I added the stork, lily pads and reeds. No sentiment on this so it can be used for almost any occasion. My DT colleagues have also creating some stunning cards - please do pop over and investigate. See you soon - J xx

Must Try Harder!!!

Image
That's what all my school teachers used to say and I'm still the same!! I get distracted - if it's not mum then I tend to find something To Do that's not on my To Do list!! This is probably why I didn't fix my lap top in time to post these cards. This one should have been for Christmas 24 #003 Challenge - Dry and/or Heat Embossing It's from the Stampin' Up set Shine Bright and the image is heat embossed with gold embossing powder. I then coloured it using my Blends - a few sparkly gems add the finishing touch. This card is for the current challenge over at Rainbow Card Challenge This is an easel card using the Poppy Dies from the new mini catalogue from Stampin' Up - can't wait to use them in red! Thanks for stopping by today - see you soon - J xx

Sympathy Stork

Image
Sympathy cards are probably some of the hardest to do - especially when it's someone you know. This is a card I made for a friend who sadly lost her husband. No sentiment or words - what can you say - but just quiet and peaceful. Lily Pad Lake was used and teals and blues for the colour. My stork was stamped and die cut on the Big Shot as this set has marvellously matching dies. See you soon - j xx

Retired Stash Saturday - Fabulous Flamingo Birthday Card

Image
Today's card uses one of the sets that recently retired - one that I'm not ready to let go of just yet! It's Fabulous Flamingo and today I've teamed it up with the Tropical Chic set - still available. So this card is mad up of several layers. The first is a Pale pink card stock on to which I have matted a layer of white. This has been stamped with green inks and the leaves from the Tropical Chic set. On to this I have layered a piece of vellum. This has been die cut with one of the dies from the tropical Dies set. Finally the flamingo was stamped and fussy cut and added along with some die cut flowers and leaves. I love flamingos so I can see this set remaining a favourite for a very long time! See you soon - J xx

Nice and Nautical

Image
I have another challenge card for you today. I am joining in the challenge over at Freshly Made Sketches And here is my card I have used my new Sailing Home Bundle isn't it gorgeous? I love anything to do with the sea and this set has ships, anchors, lighthouse,compass and rope - perfect for those hard to make masculine cards! So, I stamped my lighthouse and die cut it. The seaweed was die cut from some of my Perennial Essence DSP and the anchor from some copper foil card stock. The background was sponged with Bermuda Bay ink. All products can be ordered from my online shop - see links above. I seem to be burning the candle at both ends lately: get up early for work, get home early afternoon to catch up on housework etc, get mum settled for the night and then craft till my eyes close! I even managed to fit in some gardening today too! It makes me really happy though as I can remember a time when there was nothing but despair and I didn't...

A Forgotten Tutorial

Image
I was cleaning up the Gallery on my phone when I came across some photographs that I took ages ago - before I became a Stampin' Up demo even so you can tell how long ago it was! The photographs were of a Tent Fold card and I had taken them step by step as I made it. The stamps used are walk in the Wild which are sadly retired now - but any set can be used for this technique and I needed to get the photos off my phone so here goes! First take a piece of card stock 2 1/2" x 4 1/2" and score in half down the longest side. Now take a piece of card stock 11 1/2" x 4 1/2" Score down at 1 1/4", 5 3/4" and 10" Crease the folds with a bone folder. Now die cut an aperture in the front of your card using a nesting die. Using the nesting dies create a frame to sit on the aperture. With the largest die used cut a piece of card stock for stamping on. With inks and sponges (or daubers) start to create a backgro...

An Oldie But A Goodie!

Image
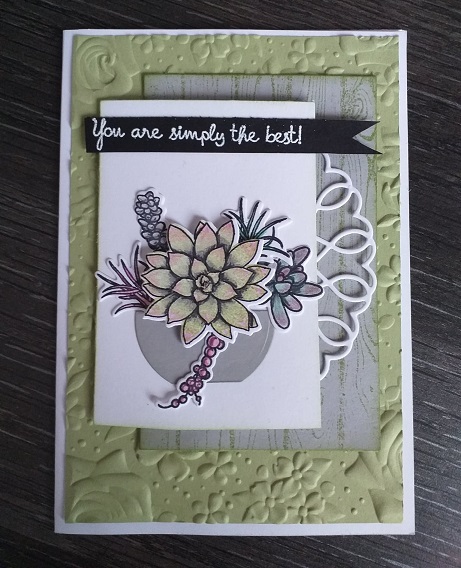
Before i became a demonstrator I made a purchase of a second hand Stampin' Up bundle: Oh So Succulent and the matching dies. It was a set I had always hankered after but missed out when it was current. I was lucky to find it when I was browsing Ebay and I snapped it up immediately! So I've had a bit of a play and this is what I made The succulent images were stamped and coloured with a combination of Stampin' Markers and coloured pencils. They were then die cut on my Big Shot. The vase is a die cut circle cut in half and the die cut images were arranged on top of it with glue and dimensionals. The background is the recently retired Hardwood stamp and the Country Floral 3D embossing folder which is available in the current catalogue. I really love succulents and I'm just about to start preparing a patch of ground in my garden which I'm going to turn into a succulent and alpine garden - that's if it doesn't rain again!! Thanks for lookin...

Another Flamingo Card!

Image
So while I was making one flamingo card I thought - I might as well make two! Take a look at this fun flamingo This one is a little more clean and simple compared to the first. I coloured my flamingo image the same way using markers but this time I mounted it onto some pale pink card stock. Next I took a piece of white card and ran it through my Big Shot in a leafy embossing folder. I mounted this onto some green card and then added the stamped panel. The whole thing was mounted onto a white C6 card base. Here's the two cards together Thanks for stopping by today and taking a look at my blog - hope you liked it. Please come back again soon - bye for now - J xx

Fancy Fold Bridge Card Tutorial

Image
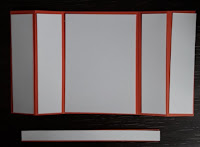
Today's card is a Bridge Card - I would also like to share with you how I made it. Here is a small tutorial. I took a piece of coloured card sock and scored it into three equal sections. The two outside sections were also scored down the middle - all were creased with a bone folder. White card stock was cut to fit each section.  The images from Climbing Orchid were stamped, coloured, die cut and assembled. A branch from Seasonal Layers was also die cut.  The white card stock was stamped with the Hardwood stamp and the edges sponged. This was done with Crumb Cake ink and Early Espresso. The pieces were stuck down.  The orchid images were arranged and stuck down. A piece of card stock was attached to the card which enables the card to stand up. The strip is the length of the card when one of the side panels has been folded in. This means that it folds flat for posting.  More orchids were assembled to decorate the side panels.  A sen...

A Little Bit of Sparkle

Image
So - it's been a lousy week. I have a viral infection which has messed with my fibro, this has left me feeling pretty fed up as I haven't felt able to do anything. Yesterday however I was feeling a bit better so I had a little play. It's not a very detailed card as just lifting my Big Shot on to my desk did me in! Here it is The branch from Seasonal Layers Thinlits was die cut from some glitter paper and a die cut orchid was attached with Dimensionals. The sentiment is from Blooms and Wishes and is stamped in Early Espresso ink on Sahara Sand card stock. A glitter centre to the flower adds the perfect finishing touch. I am entering this card into the challenge over at CAS(E) this Sketch Thanks for stopping by today - don't know when I shall be back, on top of this fibro/flu of mine Mum was taken into hospital this morning - it never rains but it pours as they say - 'cept it's snowing here which is why I didn't go with her. Hopefuly I...

Blue and White

Image
I've finally found some time for crafting! Work has been pretty full on lately but I've treated myself to a week's holiday and boy am I enjoying myself: late nights, long lie ins and lunches out with family and friends. So in amongst all this frivolity I have crafted a card - take a look For this card I used my colourful Seasons Bundle which includes the Colourful Seasons stamp set and the Seasonal Layers Thinlits. My flowers were die cut from Dapper Denim card stock and three of them were stamped with the stamens and heat set with white embossing powder. The leaves are die cut from Soft Sky card stock and the branch and background mats are again Dapper Denim. This card was inspired by one I saw on  Narelle Farrugia  's blog and is going to be entered into the challenge over on Make My Monday Challenge # 62 Blue and White  Thanks for stopping by today - all products used on today's project are available in the current Stampin' Up ...

Moon Baby Boy

Image
I have another Moon Baby card to show off today, this time for a baby boy. Have a look and tell me what you think. This is very similar to the pink one I made  HERE . I used Bundle of Love DSP and Dapper Denim card stock. I used my own alphabet dies to die cut the letters and a scrap of old DSP for the baby gro and umbrella. This is the tutorial I used Most of the products used on this card can be ordered from Stampin' Up through me. Have a browse through the catalogue in the side bar and place an order by emailing me on jacquelinenm68@gmail.com or go to my online shop HERE Items can be delivered straight to your door (£4.95 p+p) . Thanks for stopping by today - see you soon - J xx

By the Tranquil Tide

Image
I've been a bit quiet lately as I've had my daughter staying with me. She's a teacher so she's enjoying six week off at the moment so I've managed to see her quite a lot. Today's card uses a retired set, one I'm very reluctant to part with - By the Tide. Stampin' Up have loads of lovely stuff in their catalogue - you just have to click on the link in my side bar to peruse all the loveliness! Here is my card My circle was die cut on my Big Shot and the white coral was heat embossed with white embossing powder. Soft Sky and Tranquil Tide ink was sponged over to make the coral stand out. The lobster and shell were also heat embossed in white and sponged with Tranquil Tide before being cut out and attached with Dimensionals. This card is being entered in to two challenges Freshly Made Sketches The Joy Of Sets Hope everyone is enjoying the Bank Holiday weekend - I have to work so please send me lots of sympathy please!! ...