Posts

Showing posts with the label 2017/18 Catalogue

Facebook Swaps

Image
Today I don't have a card to share with you but a project I created a while ago for a Facebook swap. I'm part of a group of like minded crafters on Facebook and there are always loads of exciting things to join in with every month.  So a while ago I took part in a swap where the challenge was to decorate some wooden pegs - I loved doing this and here are the results The paper I used is retired now but it's one of my favourites as I love floral designs. I also used a variety of dies and punches to layer up adding some glitter paper, rhinestones and clay flowers. To make the package a bit prettier I clipped them to a piece of card stock and die cut some letters to add the word HELLO. I'm having a very lazy morning here in Hereford as I am typing this in my PJs! I'm off out later to visit some lovely friends who I haven't seen in a while so I'm really looking forward to that. And then tomorrow when I post again I shall probably be back at home ...

Stampin' Up News

Image
In October of this year Stampin' Up celebrates it's 30th birthday. That's 30 years of bringing us quality stamps and products. Products that you can find today in the current catalogues. Main Catalogue These products are available throughout the Stampin' Up year and can be ordered any time. Spring/Summer Mini These products are available from January to the end of May. Sale-a-bration This offer is only on from January to March and only available to purchase with a qualifying order of £45 or more. All the products can be viewed in my online shop HERE All items ordered can be sent direct to your home (p+p £4.95) anywhere in the country. So - what are you waiting for???? My order went in earlier today for new Spring/Summer items and I was able to add 2 free Sale-a-bration items to my order - roll on next week that's all I say!! The flu is well on the way out and my first shift back at work is Wednesday so I'm hoping my order a...

Pretty Flamingo

Image
So the flu is still rampaging but I do feel marginally better and mum is out of hospital so things are looking up! The card I have for you today features my beautiful Fabulous Flamingo - take a look My background was created by swiping a baby wipe and ink over my Whisper White card stock. I then stamped my grass and sponged the bottom of that to make a little piece of land. Finally I stamped my flamingo. I am entering my card into the challenge over at Sketch Saturday I'm off now to order some goodies from the new Spring/Summer mini catalogue and hopefully qualify for some free Sale-a-bration items on the way!!! See you soon - J xx

A Little Bit of Sparkle

Image
So - it's been a lousy week. I have a viral infection which has messed with my fibro, this has left me feeling pretty fed up as I haven't felt able to do anything. Yesterday however I was feeling a bit better so I had a little play. It's not a very detailed card as just lifting my Big Shot on to my desk did me in! Here it is The branch from Seasonal Layers Thinlits was die cut from some glitter paper and a die cut orchid was attached with Dimensionals. The sentiment is from Blooms and Wishes and is stamped in Early Espresso ink on Sahara Sand card stock. A glitter centre to the flower adds the perfect finishing touch. I am entering this card into the challenge over at CAS(E) this Sketch Thanks for stopping by today - don't know when I shall be back, on top of this fibro/flu of mine Mum was taken into hospital this morning - it never rains but it pours as they say - 'cept it's snowing here which is why I didn't go with her. Hopefuly I...

Festive Silver Tree

Image
Time for another Christmas card - well it is that time of year! Today's card is a little festive scene in cool blues and silver - take a look The gorgeous ginormous snowflakes are from the Seasonal Layers Thinlets set. My silver tree is heat embossed to give it a frosty feel - did you see that I stamped it upside down to make the shadow? Hope you like it - see you soon - J xx

Winter Migration

Image
So, the clocks have changed and the days are getting shorter. They are also getting a lot colder too and my little crafting space in the garage is getting decidedly chilly!  I used to only craft down there in the summer and craft very minimally in the winter  - just make the odd Christmas card. My main winter hobby was usually beading as that could be done in front of the telly in the warm and cosy living room.  The thing is  - I don't want to stop card making  - I  want to carry on all through the winter especially as I'm a Stampin' Up demonstrator again.  So over the weekend I migrated from the cold dark garage up into my bedroom. It's been a mammoth task  - I've had to completely change everything around,  extend shelves and install cupboards but it's been worth it as now I can craft in comfort. I'm also closer to the kitchen so more cups of tea!!! Ok  - so no new cards yet so here's one I made earlier This is a card ...

Painted Harvest Diamonds

Image
Oh dear - it's been a while. My treatment for my fibro is continuing and it's not exactly been pain free. I was referred to the gym by my dr - I go twice a week and it's tough! Any way enough about me - I managed to fit in a bit of crafting today and I had another play with my Painted Harvest set. The background is So Saffron card stock and it has been stamped with the Hardwood stamp - it's huge it did the whole background in one stamp! It was stamped in Crumb Cake ink which was also sponged around the edge along with some Early Espresso. The diamonds were cut from So Saffron and Crumb Cake card stock - again sponged with Crumb Cake and Early Espresso ink. The Sunflower  - stamped in So Saffron and Crushed Curry ink was attached using Dimensionals. The leaves were stamped in Lemon Lime Twist and Old Olive ink and punched out using the co-ordinating punch. The sentiment is from the Graceful Garden set. This card is being entered into the challenge at C...

World Card Making Day

Image
For one day a year the whole world comes together to do one thing - make cards. This year that day is October 7th. For Stampin' Up though one day wasn't enough and the celebrations have started. Up until the 10th of October Stampin' Up are offering the following promotions for it's customers Don't forget that there are loads of fab designer series papers that co-ordinate with these stamps. Stampin' Up have listed them here for you so you can see them at a glance To order any of these items please do get in touch or go to my on-line shop HERE See you soon - J xx

Fabulous Flamingo Phone Case

Image
Wow - what happened to September, where did it go??? Time is moving so fast and I seem to have done so little! I am having treatment for my fibromyalgia - I have to go to the gym twice a week and surprisingly I am finding that I quite enjoy it - it's not as good as swimming which I LOVE but I am enjoying it! I have managed to grab a little time for crafting and today I have a tutorial for you on how I personalised my phone case - take a look I started with a clear plastic case which fitted my phone - bought mine in a shop in Hereford High Street but take a look on line as I'm sure they are available there too. Draw around the case cut it out and then place inside the case to check the fit. At the same time mark the holes for the camera etc and cut those out too. I was creating a sea scene on mine so I masked off the area for the sky first using post it notes. The sky was sponged with a pale blue ink - Soft Sky.  After that the sea and beach were add...

Purple Tulips

Image
Today I have a card to show you that I made quite a while ago. My wrists haven't been up to crafting and my hands don't like cutting much at the moment so it's lucky that I have a few cards in hand to put up on my blog! I've used Tranquil Tulips one of the fabulous Hostess sets - take a look My tulips are coloured with Fresh Fig ink while the little orange ones are Tangerine Tango. The leaves and grass are Always Artichoke. The sentiment is from Climbing Orchid. I am entering this card into the challenge over at The Joy of Sets To get this set you need to place an order of £150 or more OR host a party and have combined sales of £150 or more (excluding p+p). Please message me to place an order or to book a party. thanks for stopping by today - see you soon - J xx

Orchid Flower Wreath

Image
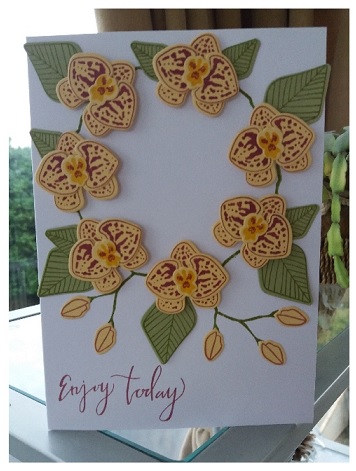
So, it's been a while since I last blogged - my fibro has been playing up and it's been difficult to craft. However I have some new stuff to show you this week so please do come back! Today's card is one I made for a recent swap. It uses the Climbing Orchid set and the brief was a summery wreath. Well most of my orchids have been in bloom over the summer so I chose that as my inspiration and made this card I drew a circle on my card blank in pencil and then went over the top with the stem stamps. I then added my orchid flowers around the circle adding a few leaves and buds. The orchids are So Saffron card stock stamped with Berry Burst ink. These flowers are so quick and easy to make especially as there is a matching set of dies. Not only do the flowers die cut but the buds and leaves too - making a card like this is a doddle! If you wouls like to order the Climbing Orchid stamp set and dies or indeed any Stampin' Up product please do get in touch -...

Blooms in Orange

Image
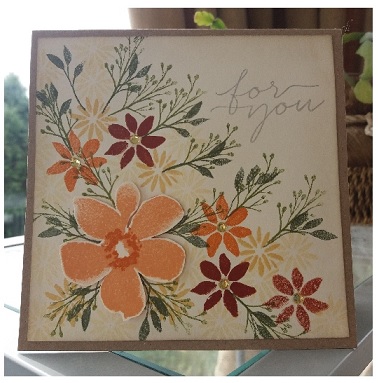
I have a floral card for you today - in fall colours - take a look The main large flower has been been cut out separately and attached with Dimensionals. Stamp set used - Blooms and Wishes. Colours used - Peek a boo Peach, Pumpkin Pie, Cajun Craze, So Saffron, Old Olive and Always Artichoke. I will be entering this card into the challenge over at Hiding in my Craftroom HIMCR #316 - Fall Colors! To order any of the above Stampin' Up products or request either of the current catalogues email me or go to my online shop HERE Thanks for looking - see you soon - J xx

Blast from the Past

Image
CAS Colours & Sketches  have a 'Double' challenge this week - that is a colour challenge and a sketch together. The three colours of ink are all retired however I have them stashed away on my 'Retired Shelf'! So I dusted them off and got to work making this card. Actually only two of the inks were used in the end. The rose - from Graceful Garden, was stamped onto Pretty in Pink DSP, the leaves were stamped in the Certain Celery and the the band of Bashful Blue was created by masking off the band and stamping and sponging. It was lovely to re-visit the old colours but Stampin' Up have loads of current colours just as lovely. Just take a look through the catalogue in my side bar and you will see - Powder Pink, Wild Wasabi and Soft Sky would be perfect for this. Thanks for stopping by today - see you soon - J xx

A Pair of Flamingoes

Image
Fabulous Flamingo has to be one of my all time favourite stamp sets. I love it! Any excuse to create a pink and girly card and out it comes! Today I was browsing around Pinterest and I came across this card  HERE . It's by one of my favourite stampers: Michelle Zindorf and I just had to have a go at CASEing it - come and take a look I changed mine a little - I added an extra flamingo and made it landscape instead of portrait and I'm extremely pleased with how it turned out. Soft Sky was used for the sky (naturally) and Pool Party for the sea. The beach was created with Crumb Cake sand Chocolate Chip and the grasses are Always Artichoke. The palm fronds are Old Olive and it's all mounted onto a mat of Lemon Lime Twist. I used Flirty Flamingo ink for my flamingo and I heat embossed the feather details with white embossing powder. I also used a Blushing Bride marker to add more colour. The eye and beak were also added with a marker pen. I am entering t...

Moon Baby Boy

Image
I have another Moon Baby card to show off today, this time for a baby boy. Have a look and tell me what you think. This is very similar to the pink one I made  HERE . I used Bundle of Love DSP and Dapper Denim card stock. I used my own alphabet dies to die cut the letters and a scrap of old DSP for the baby gro and umbrella. This is the tutorial I used Most of the products used on this card can be ordered from Stampin' Up through me. Have a browse through the catalogue in the side bar and place an order by emailing me on jacquelinenm68@gmail.com or go to my online shop HERE Items can be delivered straight to your door (£4.95 p+p) . Thanks for stopping by today - see you soon - J xx

You Shall Have A Fishy

Image
On the card I have made for you today I have combined two stamp sets - High Tide and Jar of Love I created my background scene with the lighthouse and made a section of beach in the foreground by using a torn post it note and a sponge. The Crumb Cake ink was sponged over the post it note and then a mask was made to add the grass. I cut out a jar and added some water to it using the sea stamp and sponging Pool Party ink over it. The little fishy was stamped inside the jar and the handle was heat embossed with silver embossing powder. It was attached to the card using Dimensionals. Thanks for looking today - hope you like my seaside card. See you soon - J xx

Calypso Coral Rose

Image
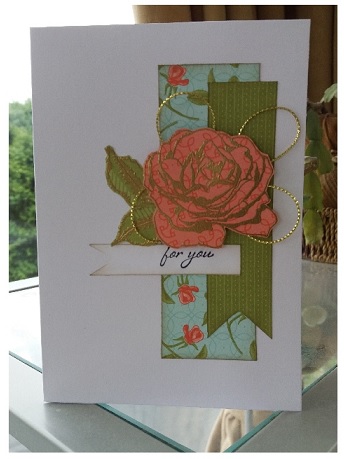
I have been creating with Graceful Garden again and this is what I have come up with - I've used Petal Garden DSP for the background and used some to stamp my rose on to. I used gold embossing powder on the rose and cut it out. Some gold thread was added under the rose and the  little sentiment was added. this card is being entered into the challenge over at Freshly Made Sketches Thank you for dropping by today - I hope that the weather has been kinder where you are - we've had more rain!!! See you soon - J xx

Card Pouch Tutorial

Image
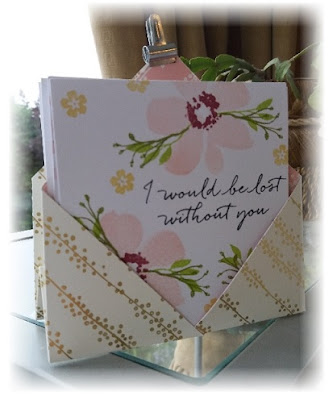
Good evening - and as promised I have the instructions for the little pouch I made for my note cards. It's very easy - take a look Take a piece of decorative paper 9" x 9" square. Fold in half along the diagonal and crease firmly with a bone folder. While the paper is in half score 2" along the diagonal. Score each corner 4" in. Your paper should look like the diagram above and the picture to the left. Fold in the two corners - they will overlap. Remember to crease each fold with the bone folder. Then fold in half. (Ignore the clip at this stage - it was for photographing purposes!!!) Fold the sides down so that an envelope shape forms. Do this for both sides and secure with a clip - like in the picture below. Because of the way it is folded it can be stood up but also can be folded flat to post - it makes a lovely gift. I used Blooms and Wishes to decorate my note cards I hope you like this little...