Posts

Showing posts with the label Stampin' Up

Red and Gold

Image
It's been a horrible day here today. Really dark and wet and miserable. What better way to while away the hours than crafting? Today I have a card for two challenges:  52{C}CT  which has the theme Friends and Family, and  The Paper Players  who have a sketch Here is my card Eeeek- my one tree looks a bit wonky doesn't it!!!!! I love this sentiment which comes with the house in the Holiday Home set, I've heat embossed the house, trees and sentiment with gold embossing powder and the house and trees are attached with 3D foam pads. Thanks for stopping by today - hope the weather is a bit better where you are! xx
Green and Purple Christmas Card

Image
I'm back with another Christmas card - this time it's for the challenge over on the  52 {Christmas} Card Throwdown . This week they have a gorgeous colour combo - take a look The colours I chose for my card are Gumball Green and Elegant Eggplant The tree and deer were stamped with Versamark and heat embossed with a clear embossing powder. I then masked off the ground and sponged the green ink over the images. Purple snowflakes were added with sparkly gem centres and some dazzling diamond glitter was added to give a more Christmassy look. The card base was one that had gone wrong on a previous project but the decorated panel fitted perfectly on the card covering the hideous mistake but still showing a bit of the tree underneath - I like it when things work out like that don't you?! Thank you to the lovely 52{C}CT dt ladies for picking last week's card for an Honorable Mention. See you soon xx
Image
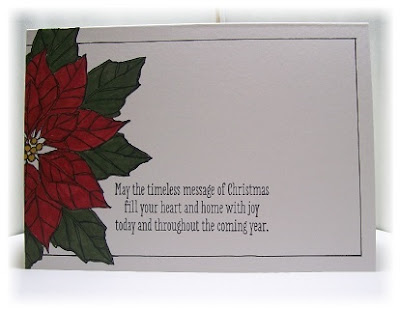
This is a card I made last year and I'm only just getting around to posting it - take a look It's very clean and simple and I've only used half the stamp from the Joyful Christmas set. I coloured the images with markers and added a hand drawn frame. I am entering this card into the challenge at  A SNOWFLAKES PROMISE  where the theme is Anything Goes with a Winter or Christmas theme. Thanks for stopping by today, my next post will be a tutorial  - hope you can make it xx

Fire

Image
Hello - it's been a while I know but I'm still here and I have a card to share with you today! I made this card ages ago for a challenge but missed the deadline and then forgot all about it. I was then mooching around blogland and happened upon one of my favourite challenge sites -  LESS IS MORE  and discovered that their challenge this week is perfect for my card. The theme is FIRE and to use the colours you would see in a fire - what do you think? I created my Autumn scene by first masking off the middle section and sponging it with some Pumpkin Pie ink. I punched a circle out of a post it note and sponged inside the stencil to get my sun - I used Tangelo Twist for that and for the deer silhouettes. Before removing the masking I then stamped my trees with Versamark and added some white embossing powder. After heating it I removed the mask and added my sentiment. Thanks for looking - see you soon xx

MMM - Sprays and Mists

Image
The lovely Laura has chosen our theme this week at  Make My Monday  - Sprays and Mists. Here is my card The only spray or mist I own is a Perfect Pearls one in Gumball Pink but I think I managed to make it look Christmassy! The spray is on the background which is the Hardwood stamp, stamped on to Blushing Bride card stock with Blushing Bride ink. The pearlescent spray was then sprayed on to the background. Thanks for looking - no doubt I shall be back later with my now becoming usual Monday 'catch-up' post! xx

ATC - Stamp and Swap

Image
It's the first of the month and a brand new theme on the  ATC - Stamp and Swap Blog . This month's theme is Silhouettes and here are some of mine Each one has been created using a piece of white card and a post-it-note circle to make a sun or a moon. Ink has then been sponged over to create a background. I then took some solid silhouette stamps and stamped them in black ink - or in the case of the green one - green. The green ATC has been sponged with Handsome Hunter ink and a stamp from the Stampin' Up set Pocket Silhouettes was stamped using the same ink. A piece of copy paper was ripped, placed on the upper part of the ATC and a darker layer of ink was added to make a hill. The blue ATC was sponged with Brocade Blue ink and the moon was sponged with Daffodil Delight. The stamps used are my own designs and the trees were stamped twice before re-inking to give depth to the scene. The final ATC was sponged with Pumpkin Pie ink and Chocolate Chip. The stamped image is o...

Dandelion.

Image
My freebie Dandelion digi has been in my side bar for just over a week now and it's been great to know that people have liked it and requested to download it. I also thought that I should have a go at using it my self! I had a fresh order of Stampin' Up card stock and ink a while a go and I have been dying to use the two blues - Tempting Turquoise and Pacific Point and I thought that this would be the ideal opportunity to do so. So I downloaded the digi - twice and cut them to size. I sponged them with the blue inks and layered them onto some Tempting Turquoise card stock.   I added a silver clip to the larger of the pictures and tied on a piece of organza ribbon. This was originally white but I ran it over my ink pad before heating it with my heat gun - this not only dried the ink but also melted the ribbon slightly giving it a crinkled look. I added a sympathy sentiment - thankfully I don't need such a card at the moment but I thought it looked a peaceful sort of card...

September Workshop

Image
I will be doing three workshops this month the first being this Thursday night (1st). My theme is swing cards and this is one I have made as example to show on the night - take a look This is the front - it's a base of Really Rust (retired) with some Very Vanilla layered on top. This has then been stamped with all of the stamps from the French Foliage set. The leaves in the middle have been layered on using 3D foam pads as have the leaves down the side. Here is a view of it when it is opened The plain panel is for writing your birthday greetings. The inks I have used are Stampin' Up - Really Rust, Pumpkin Pie and More Mustard. I also used a couple of Memento ink pads in Rich Cocoa and Desert Sand. More examples and some instructions will be available after the workshop on Thursday. Thanks for stopping by today and leaving your lovely comments, bye for now - Jacqueline xx

Lost and Found

Image
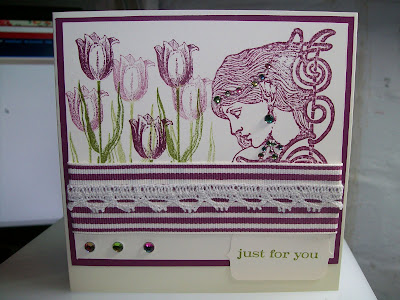
I was lucky enough recently to receive a free gift with a Stampin' Up order, amongst it was some wide, striped gross grain ribbon. It was in Rich Razzleberry which is a gorgeous deep raspberry colour. Today was the day that I was going to use it and whilst rummaging around in a cupboard I found two stamps that hadn't seen the light of day for a long time. In fact I had forgotten that I even had one of them! So they were dragged out and given an airing in honour of the occasion. They are both quite intricate stamps so I kept the colour scheme simple. I matched the ribbon with some card stock and ink and added a touch of green - take a look The tulips were stamped twice before re-inking to give a paler tone to the Rich Razzleberry. As the ribbon was so wide I also added a strip of vintage lace . The sentiment was stamped on to a hand cut cut label and some pinky green gems were then added to finish it all off. I am entering this card into The Fashionable Stamping Challenge w...

Past Challenges at Less is More.

Image
Today at  Less is More  we have been challenged with choosing 3 past challenges and making a clean and simple card. I chose my 3 and made my card but looking at it I think it may have involved a couple more but here goes Gosh that's a horrible photo - the light is not good at the moment sorry. I started off with a 5" x 5" card base in white and faintly drew 3 squares (wk 4) into these I stamped a flower from the Stampin' Up set Growing Green. I then took a fine liner pen and squiggled a frame around each one (wk 19). I then rubbed out my guidelines and added 3 butterflies (wk 16) punched from red paper (wk 9) so really that's 4 challenges - hope you don't mind Mandi and Chrissie Thanks for the great challenge ladies - have a good weekend - Jacqueline xx

Going Dotty.

Image
It's no surprise that this card has taken me all day to make - Bev came round about 11.30 this morning so say no more!! I started with a piece of Stampin' Up DSP and some pink dotty paper that I can't remember where it came from.  Next came the stamp - free from the cover of Craft Stamper magazine, a cute little flower from Polka Doodles. Add together some marker pens, flowers and foliage - this is what you get But that's not all - it opens out into this easel card The sentiment in the middle is from Stampin' Up set Simply Said and says -'a friend is someone who makes it easy'- it's not easy to see in these pics I'm sorry my photos are so terrible but the light in my craft room today is horrendous - it has also rained all day - so much for the Bank Holiday! Thanks for stopping by and if you are interested I am entering my card to the following challenges Polka Doodles  - Spots and Dots. Stampin' B's  - Round or Square Easel Cards. Th...

Making the most of a mistake.

Image
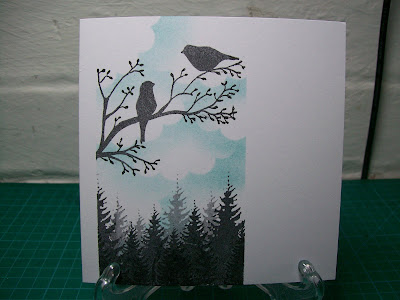
Sometimes when trying out a new technique I will practice first - just to make sure I know what I am doing and last week I did just that. I practised the sky - sponging round the edges of a scallop circle, I used my new tree stamps - these worked really well and all was going swimmingly. Then I stamped my birds on a branch stamp and it all went a bit wrong. I had over inked my stamp and transferred that to my paper. I threw it away in disgust and started again. The thing is I couldn't throw it away so I started to play (after all I had nothing to lose) - I added a touch of Rock Candy Distress Stickles to the birds, coloured over my mistakes with a green marker pen and low and behold my mistake had turned into a masterpiece - well I think so anyway!! - take a look The bird in the bottom right hand corner is punched from the Stampin' Up 2 Step bird Punch and I added a little green gem for his eye. I am now on a mission - my husband usually works from home ............... in th...

Pop-up Penguins.

Image
I had great fun yesterday making this card. It all began with the challenge over on  Simply Stampin'  - they are a challenge site for Stampin' Up fans who love to use Stampin' Up products on their cards. This week the challenge is 'Punch it Up' - that is make something with punches or die cuts etc - and so the fun began. I took my 2 Step Owl Punch (never very far from my side) and punched out some owls using Basic Black card stock, hacked off their ears and this is what I made It's a penguin - the feet were cut out using Summer Sun, his chest is Whisper White and his beak is Pumpkin Pie. The stars are stamped and embossed using Hung Up On The Holidays and the igloo was made using a half circle of card hand embossed and inked with Baja Breeze ink. Want to see inside? ................... take a look More penguins! This time time they are popping up out of the igloos - I also added a Christmas greeting. The background card stock is some that is retired now - Bro...

MMM - Challenge 12 - Things With Wings Using Acetate.

Image
I'm a day late posting this as I was away visiting Mum and Dad - Dad has had some more chemo treatment but is still doing OK at the moment. So this week at  Make My Monday  the challenge is THINGS WITH WINGS AND USE SOME ACETATE. The dt have made some gorgeous samples this week and can be viewed in full on the MMM blog and you can click on their names and visit the blogs to find out how they were all made. Here is my card The card opens up to reveal the bees buzzing around the flowers suspended on thin strips of acetate. I used a 5" x 5" cream card base, some Pear Pizzazz and Very Vanilla card stock, the In Colour Stampin' Write markers and Stampin' Up stamp set Nature Walk. Hope you can find the time to take part this week - bye for now - Jacqueline xx.

Altered Notebook.

Image
I have a friend's birthday coming up soon and I always like to make her a little something. This year I have made a notebook. I salvaged some pages from an old A4 pad, cut them down to size and bound them together with my Bind it All machine. I decorated the cover with some Stampin' Up DSP - take a look The paper is from the Springtime Vintage collection and I have teamed it up with some Very Vanilla card stock. The little dotty frame is stamped from the Baby Blossoms set and my flower is made using some die cuts. The edges of the petals have been sponged with Baja Breeze ink. I am entering this notebook into the challenge over at  "Just Us Girls"  which has the theme of Altered Notebooks and then I shall wrap it up ready for my friend. I am away for a few days tomorrow - I am hoping to schedule some posts, whether this will work I don't know - but there's only one way to find out ........see you soon - Jacqueline xx

Beside the sea with Nature Walk

Image
I thought that I would enter the  St. Luke's Charity Cards Challenge  again this month but I'm a bit worried because I don't have any seaside stamps and I decided to improvise instead. Here is my card I started off by sponging my sky with a scallop circle and Baja Breeze ink, the sun was also sponged in using Summer Sun. I tore some copy paper to make hill shapes and used them again to sponge in my sand dunes. The sea was done in exactly the same way only I used some paper that had been cut with a wavy blade. Finally some flowers from the Stampin' Up set Nature walk were stamped in the foreground and coloured using my set of 'In Colours' Stampin' Write Markers. Hope you like it - I'm off now to put my camera batteries on charge as they have just given up on me! Bye for now - Jacqueline xx

One Layer Card.

Image
Good afternoon, hope everyone is having a great weekend. One layer cards are something that I have recently got into. I used to pile up my cards with papers, ribbons and embellishments - I still do sometimes but clean and simple cards are starting to appeal to me more and more. I especially like brayering but this week at  Less is More  Mandi and Chrissie want a one layer card using ink (can be ink pads) in a way you normally wouldn't. So instead of my brayer I got out some sponges and sponged a sky using a scallop circle (seen this alot but have never tried it myself) This is a great technique for creating clouds and I will be entering this card in to  Stampin' B's  challenge which this week is create a card with clouds on it. I used Stampin' Up ink in Baja Breeze and a Memento ink pad in Tuxedo Black. The stamps are my own designs but I had a little calamity with the birds as around the thin branches I had over inked my stamp and I had a black shadow around them...

One Card - 3 Challenges.

Image
It will come as no surprise to my regular blog readers that I am a Stampin' Up freak. I love stamping and buy loads of stamps, but for me Stampin' Up are the be all and end all of rubber stamps. So it was with great pleasure that I created today's card with three Stampin' Up challenges in mind. Firstly I will show you my card I started as always with a white 5" x 5" card base and the layout was taken from the sketch over on  Simply Stampin' The colour scheme was taken from this week's  Colour Throwdown And finally the challenge this time at  SUO Challenges  is Favourite New Stamp Sets. My newest set is the Growing Green and I love it - definitely a favourite. It looks great with the extra bling don't you think? The sentiment is from Bird on a Branch and I have used some 3D foam pads for extra dimension. Thanks for stopping by today - hope to See you again soon - Jacqueline xx.

Pop-up Owl Card Tutorial.

Image
You may remember last week I showed you the pop-up owl card that we would be making today at my monthly workshop - you can see it  here . It went down extremely well and everyone went home with their own pop-up owl card 'cos I spent all day Sunday punching out owls and cutting up card to make bunting. I didn't actually make the owls - I sorted all their bits into little cake cases for them to do it themselves. I then did a demo of a more advanced pop-up, it still uses the owl punch but there are more complicated cuts involved. For this card I used a 5" x 5" square card base and I cut another piece of coloured card measuring 9 7/16" x 4 3/4" - this was folded in half and two cuts were made into the fold 1" in from each end and each 1 1/4" long. You now have three sections - fold the middle section up and crease Flatten the flap back down and carefully open your card, now press the middle section through and fold it inside the card - it should now...

MMM - Challenge 10 - Birds or Bugs.

Image
We are on week 10 at Make My Monday and as the title implies it's Birds or Bugs . I have chosen Birds and I have made a card with no stamping whatsoever! Take a look This one of my favourite layouts at the moment and this time I have put the same bird in each square. The base card is a 5" x 5" square card with a layer of Chocolate Chip card stock. This is then layered with a piece of designer paper and then small squares of the Chocolate Chip and Very Vanilla card. The birds are punched from Chocolate Chip and some more designer paper and each has a tiny blue gem for an eye. All supplies except for the gems are Stampin' Up. I would just like to say congrats to my good friend Beverely as she came top3 this week - well done and see you Tuesday! Now what are you waiting for - get on over there and have a go. Oh - by the way you can get there by catching a ride  HERE  - see you - Jacqueline xx