Posts

Showing posts from 2011

New challenge Blog - Come and join in

Image
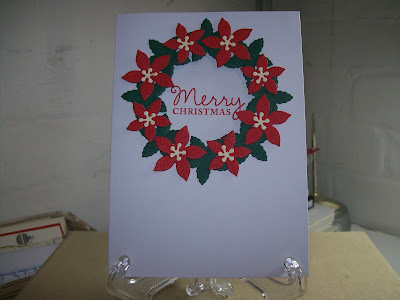
Good morning, it's the last day of the year and  Mynnette  I are kicking off our *NEW* challenge blog the  52 {Christmas} Card Throwdown  with a fabulous ANYTHING GOES theme. (Well it's Anything Goes as long as it's Christmas!!!!) Just think how organised you could be next December if you made one Christmas card a week - how smug would you be with at least 50 uniquely hand made Christmas cards under your belt? This could be you if you join us now and - to whet your appetite here is my card to give you some inspiration I have used Stampin' Up stamp Young Vermillion and I've coloured him in using a mixture of Stampin' Write markers, Promarkers and coloured pencils. The white mats have been cut on my Cuttlebug using some Papermania Nesting Dies. I also die cut the poinsettia flowers using Marianne Creatables. Don't forget to pop over to take a look - it would be great to see you over there. I am also linking this card to the  Marianne's Design Div

Getting Punchy at SUO Challenges

Image
Well the holidays are nearly over, the family has all gone home and my husband is back at work - time to get back in the craft room and create! I was browsing blogs and webs and came across a tutorial on  Splitcoast Stampers  for a Dutch Fold Card. I changed the measurements a little as I like my cards to be square but I was really pleased with the results. I decorated it with some retired SU DSP - Springtime Vintage and then got out a few paper punches and added some embellishment - take a look The edges of the paper were inked with Early Espresso ink as were the punched out pieces of the owl. I added some Very Vanilla Gross Grain ribbon and some flat backed gems for the finishing touches. Here is what it looks like when it's opened And this what it looks like standing up I am entering this card into the  SU Only Challenge  - Feeling a Bit punchy Punches used Scallop Edge Corner Rounder 2 Step Bird Punch 2 Step Owl Punch Boho Blossoms Punch All other materia

New Christmas Challenge Blog - Coming Soon

Hello All - hope everyone has had a good Christmas and that you are all looking forward to some New Year celebrations at the weekend. This is just a quick post to let you know about a new challenge blog set up by myself and my blog buddy  Mynnette . It's called the 52 {Christmas} Card Throwdown and if you click  here  you can pop over and take a look. We go live on Saturday 31st December and we are exclusively Christmas so if you join us from the start you can have 52 cards made by Christmas! Looking forward to seeing you there - Jacqueline xx

MMM - Seasonal Tag

Image
Well I think that this may be my final post of the year as I am taking a break to enjoy family and friends over the festive season. I shall leave you with this week's card for the final challenge of 2011 over on  Make My Monday . The theme this week is a SEASONAL TAG I chose to put my tag on a card - take a look The card has been sponged with Brocade Blue ink and the edges sponged with Not Quite Navy. The trees (Pine Tree from Lovely as a Tree) have been stamped using Handsome Hunter and also with Versamark. This was then sprinkled with some Snowflake embossing powder and set using a heat gun. The tag was done exactly the same way and then attached to the card with 3D foam tape. A red ribbon was added and the seasonal sentiment. I would like to wish all my followers and visitors a very Merry Christmas and a Happy and Healthy New Year - thank you for popping by to see my blog and I hope you continue to do so - Jacqueline xx

Sketch Challenge

Image
The challenge this week at  Simply Stampin,  is a sketch - take a look Here is my card I started with a base of Crumb Cake to which I added some Island Indigo and Pool Party card stock. Stamps used are the gorgeous Agapanthus flowers from Simply Soft coloured with my Stampin' Write markers on Whisper White card stock. Thanks for coming to look today - hope to see you here again soon - Jacqueline xx

MMM - Red Ribbon

Image
Good morning all, it's Monday so that means it's challenge time over on the  Make My Monday  challenge blog. This week it's still SEASONAL projects with the added extra of RED RIBBON.  Here is my contribution to the dt line -up It's a Centre Step card - I got the instructions from the Splitcoast Stampers site (via Just Us Girls). I used Kraft card stock as my base and then used SU Lucky Limeade and Very Vanilla. The poinsettias were made using the French Foliage stamp set (see Vicky's blog  here  to see where I got my inspiration for these). They were coloured using Poppy Parade and Lucky Limeade. My RED RIBBON is wrapped around the base with my sentiment mounted onto it. Hope you have the time to pop over to the blog and take a look and maybe even have a go your self. I am also entering this card in to the  Just Us Girls  challenge as they are looking for Centre Step Cards. Bye for now - Jacqueline xx

Less is More - Let it Snow

Image
The theme this week at  Less is More  is a Let it Snow One Layer Card - here's mine The sentiment and snowflakes were stamped using a Versamark pad and then heat embossed using white embossing powder. A square was then masked off and blue ink was sponged over the images to make them stand out. A few gems were then added for the finishing touches. The snowflakes are from a little SU set - Snow Flurries and the sentiment is from Polka Doodles, the ink is SU Brocade Blue. I think that this may be one of the last Christmas cards that I make this year - unless I've miscalculated and I run out later tonight when I write my cards! Going to save my seat on the sofa now for the X Factor final might even treat myself to a small glass of wine (or two!). See you soon - Jacqueline xx

Snowflake Sparkle

Image
The theme this week at  Simply Stampin'  is 'Snowflake Sparkle'. I had to think about this one as I don't have very many SU snowflake stamps in my collection - I had to dig deep and rootle out a couple of retired sets - take a look The base card is 5" x 5" square and is stamped with a snowflake stamp from the Snow Flurries set using Ballet Blue ink and a touch of glitter. I also stamped a sentiment from the Wondrous Gift set. I then took a piece of Ballet Blue card stock and scalloped the bottom edge. On to this I stamped some fir trees from the Lovely as a Tree set - they were heat embossed with white embossing powder and a few more were stamped in blue in the background. I then found in my stash my Bird on a Branch set so he was added to the scene too along with a few snowflakes just beginning to fall. A strip of white organza ribbon just adds the final touch. See you soon - Jacqueline xx

Workshop News

Image
Today was my last Tuesday morning workshop of the year and we made notebooks. I make a lot of notebooks - they make great gifts and also they go down very well at my craft fairs. Here's a couple that I made a while ago This is the one I made today for the workshop The gorgeous dotty paper is from a DCWV pad and so is the paper used to mount my owl. The owl of course is my SU 2Step Owl punch and she is sitting on a branch punched from the 2 Step Bird punch. A third punch - Boho Blossoms was used to punch the flowers. The initial is gorgeously glittery and is from K&Company. The notebook it's self was made from a cheap A4 pad and there is a full tutorial over on my  Craft Club  blog. I also used my faithful Bind-it-All machine to give it a professional look. You could also use ring binders or ribbon if you don't have a Bind-it-All. Thanks for looking - Jacqueline xx

MMM - Seasonal Glitter

Image
It's week 27 at the  Make My Monday  challenge blog. All the details are over there on the blog and this week we want to see some - SEASONAL GLITTER. mmmmmmmmm glitter - take a look This is an old favourite, one of the first stamps I ever bought - my poinsettia medallion. Instead of going traditional and red with this I went for white. It was stamped and embossed in gold several times and layered up. The  leaves were then glittered in green. It was then layered onto some green card stock and I used a holly punch in the corners. Here is another view I decided to make it into an easel card. And then I decided to make it into a drawer gift box. Hope you have time to join in - or at least pop over to see our two new dt girlies and our Guest Designer. Bye for now - Jacqueline xx

Colour Challenge Simply Stampin' Style

Image
Yep - the title says it all - here are the colours we got to use And here is my card The stamp set used is Butterfly Prints and I have also used my Boho Blossoms and Butterfly punches. Please pop over to  Simply Stampin'  to take a look. Short stop today as I am helping my hubby pack his suitcase - he is flying to America early tomorrow morning and I am doing a craft fair at my local village Christmas Fair - that's tomorrow too.See you soon - Jacqueline xx

Finished Christmas Box

Image
I was very naughty on Monday and failed to complete my project for the  Make My Monday  challenge. Here's a quick reminder of how it looked  I have completed it now and can reveal that it was in fact an Exploding Box - here is a picture This is just one picture - if you would like to see more please hop over to the  MMM  blog 'cos over there you will see what is hiding in that box behind the Christmas trees - see you soon - Jacqueline xx

Another Wreath Card

Image
I made a card recently for the Less is More challenge -  here  - and this is more or less the same card but on a larger scale. Would you like to see? This time the Pine Tree stamp was stamped in a circle - my post it notes came in very useful again as they masked off the centre. I used two greens - Handsome Hunter and Always Artichoke. The Christmas Roses are again from the Everything Eleanor set and are stamped in black Memento ink and coloured with Promarkers. Red flat backed gems add the finishing touches along with the sentiment in the middle. Well it's the first of December tomorrow and I get to open the no.1 door on my Advent Calendar - yes it's a chocolate one and I had to buy one for my Son too , just to stop him stealing mine! - See you soon - Jacqueline xx.

Something a little bit different

Image
Here are a couple of cards that I made today whilst out playing at Jane's. She makes fabulous vintage cards all the time which you can see  here  and today was one of her classes where I had a go myself. She had loads of papers, images, ribbons and embellishments to choose from and this is what I made I started off by using some cream decorative paper that I distressed and inked with Tim Holtz Distress Inks. The red holly is an Anna Griffin Stamp as is the border at the bottom. A rosette was added with a die cut snowflake. Jane had die cut some lacy borders which went really well with my chosen image. This one started off as navy card which was layered with some red paper. Again this was distressed and inked. The vintage image was distressed also and stamped with a cute little holly stamp and some Brilliance ink. The doily was treated in the same way before layering behind the image and some ribbon added. The snowflakes were inked with more Brilliance ink and the finishi

MMM - Week 26

Image
Morning all - it's week 26 over on the  Make My Monday  challenge blog and this week we are making a DECORATED CHRISTMAS BOX Now I have known about this challenge for weeks but I only started planning it last Tuesday. I made the box, the bits inside and the lid. I decided that I would start the decoration yesterday - nothing like flying by the seat of your pants then! This is how it started I stamped out all these leaves (from the French Foliage set) and coloured them with Stampin' Write Markers (Poppy Parade and Lucky Limeade). I then cut them out. Had to take time out to do lunch and tea and then of course there was Strictly and X Factor so at 9.00 last night my box was still not completed!!! Managed to do the outside - take a look It's like this on all four sides - and the lid As for the inside of the box - you will have to wait. I'm sorry I was going to finish it this morning but as I was waiting for Il Divo to appear on Lorraine, I realised tha

Bring on the Bling

Image
This week at  Less is More  Chrissie and Mandi want to see projects with bling on them. Well I'm always happy to oblige so here is my card This is made using using one of my newest SU sets - Everything Eleanor. The large flower reminded me very much of a Christmas Rose. It was stamped with a black Memento ink pad so that I could colour it with my Promarkers. I went over the shadows in gray and coloured the stamens yellow. They were cut out and added to the card after I had stamped the foliage. This was achieved using the Pine Tree stamp from Lovely as a Tree, Handsome Hunter and Always Artichoke inks. The sentiment is from Hero Arts and finally the bling was added using some tiny red flat backed gems - oh and I also glittered the centres of the flowers too. Hope every one has a good weekend, see you soon - Jacqueline xx

Workshop News

Image
Last night was my monthly Thursday night workshop and we made this It's made by folding little squares of paper origami style and if you would like to know how to make it pop over to my  Craft Club Blog  to find out. Jacqueline xx

Simply Stampin' Sketch Challenge

Image
This week at  Simply Stampin'  we have a sketch to follow - take a look Here is my card I used Crumb Cake and Whisper White card stock and my Precious Butterflies stamp set. Inks used were Old Olive Island Indigo and Pool Party. See you soon - Jacqueline xx

French Foliage CASE

Image
French Foliage is one of my favourite Stampin' Up sets as I love nature - especially leaves. My blog friend Vicky also loves this set and a couple of days ago made a gorgeous Christmas card using one of the leaf stamps and turning it into a Poinsettia - take a look  here . Well - I e-mailed her straight away asking her if I could CASE her idea. She said yes so here it is The leaf was stamped in red, coloured with a Stampin' Write marker and cut out. I actually cut out 20 and made 3 poinsettia flowers. The leaf was then stamped on the Very Vanilla card stock in green and 2 of the flowers were stuck down flat. The third flower in the left hand bottom corner was stuck down on 3D foam pads - small yellow gems were then added to the flower centres. I found a new (new to me!) challenge blog so I would like to enter this card Cards & Things Challenges  - color challenge - Cherry Cobbler, Old Olive and Crumb Cake. Thanks for looking and thank you Vicky for letting me use

Less is More - Silhouettes

Image
This week at  Less is More  the theme is Silhouettes and as my Christmas Tree stamps were already out from yesterday I decided to use them for this card - take a look I masked off a square in the centre of the card with post it notes and made a moon from the post it notes too. After the landscape was sponged with black ink the trees were added - I stamped them twice before re-inking to create a feeling of distance. The snowflakes were stamped randomly at the two corners and clear gems were added to the middles. The finishing touch was using a black fine liner to frame the picture. Speaking of silhouettes - this is a picture I took earlier of my cat on my son's shoulder. It's not what I wanted but it makes a great silhouette!! Jacqueline xx

Homage to Barbara Gray

Image
When I first got this Clarity Stamp this is the card that I wanted to make, it's also the reason I designed the tree stamp that is also used on the card This is a one layer card - it's all created using masks and post it notes and is inspired by the cards created by Barbara Gray on Create and Craft. The sentiment was first stamped and embossed, it was then stamped onto a piece of copy paper and the centre of the O was removed. This is then placed over the sentiment on the card and the scene stamped through it. Post it notes were then used to cover the whole sentiment and the scene was continued around the edges. The landscape was created by ripping scrap copy paper and sponging. The trees were stamped twice before re-inking to give a feeling of depth and perspective. The white space around the sentiment was outlined with a black fine liner to make it stand out. Our cat Louis has found a new place to sleep ...... in the coal scuttle!! I managed to take a couple of pics o

Christmas Flowers

Image
This week at  Make My Monday  we want to see some Christmas Flowers, Foliage or Snowflakes. Now my DT have really done me proud this week and there are some absolutely gorgeous samples for you to see over on the blog - please do pop over a take a look. Before you do disappear though please take a quick look at my card I cut an aperture in my card and stamped my greeting on the inside. The front was then decorated with poinsettia flowers - these were die cut on my Cuttlebug using some Marianne Creatables dies. Sorry - it's a very quick post today as I haven't been home long. I went away leaving my son and his dad on their own...............I have a lot of housework to catch up on!!! See you soon - Jacqueline xx

Leafy Christmas Card

Image
This week at the  Simply Stampin'  challenge blog the theme is 'Leafy'. Now I had idea that I wanted to create something with mistletoe on it but it didn't turn out quite right and I think the mistletoe berries have morphed into  snowberries - anyway I added plenty of leaves!!! - take a look The cones and needles are from the Autumn Days set and are stamped in Chocolate Chip and Lucky Limeade. The scallop circle is Ruby Red card stock and this has been used to punch the poinsettia flowers and the red breast of the robin - he is Early Espresso and the leaves are punched from Old Olive with added pearls for berries. Away now to spend some time with Mum and Dad and my Daughter is joining us from uni - should be a good weekend - bye for now - Jacqueline xx

CAS - Noel

Image
I have another clean and simple card for you today using one of my favourite Christmas stamps - come and take a look The large Noel sentiment stamp is a Clarity Stamp - you may recognise it from the Create and Craft shows with Barbara Gray. The poinsettia stamp in the middle is a freebie from the Craft Stamper mag - I've had it a couple of years now but it always comes out for Christmas! I coloured it with my Stampin' write markers - Poppy Parade and Lucky Limeade. If you are interested there is a tutorial on how I made this card over on the  Make My Monday  challenge blog. Thanks for looking - see you soon - Jacqueline xx

Not A Christmas Card

Image
It seems that most of us are getting into the spirit of things and being organised by making loads of Christmas cards. So before I too abandon myself to the frenzy I have one more butterfly card to share with you. Stamps used are from the Precious Butterflies Hostess set and the colours are Sage Shadow, Almost Amethyst and Elegant Eggplant. I used my favourite ever punch Boho Blossoms to make the flowers in the centres of the butterfly rings and then added a gem to the centres of the flowers. Dad is having more chemo at the end of this week so I'm taking a few days off to go and stay with him and Mum. I shall still blog as long as make enough cards before I go and I remember to schedule them all correctly!! Bye for now - Jacqueline xx

Ghosting a Leafy Tag

Image
Another Clean and Simple card for you - for three challenges. Take a look I started with a 5" x 5" white card base and a hand made tag stencil. I then stamped the script stamp from French Foliage in Versamark ink and embossed it with clear embossing powder. I then sponged over the script with Desert Sand and Rich Cocoa Memento ink - this is the 'Ghosting' technique. The leaves were then stamped with Old Olive ink. The challenges I am entering this card into are: Less is More  - Leaves Just Us Girls  - Ghosting Technique CAS-ual Fridays  - Tag - You're It. Bye for now - Jacqueline xx

MMM - CAS Christmas

Image
It's week 24 at  Make My Monday  and we are in Christmas mode. This week we want to see Clean and Simple cards with emphasis on the sentiment. here is my contribution to this week's DT line up My huge sentiment stamp is from Clarity Stamps and  has been heat embossed in gold. The centre of the O has been removed and the ornament stamp (a freebie from the Craft Stamper mag) has been stamped inside the card. I then stamped it again on some scrap and coloured and cut out the baubles. They were then stuck on using 3D foam pads. Please pop over and take a look - we are also having a DT Call too if you fancy joining us. Details are on the blog or in the side bar. Bye for now - Jacqueline xx

Blue Eleanor

Image
Here is a card I made a while ago - I haven't had any time for crafting today as I had to re-write all my pdf file instruction sheets. Something strange happened when I tried to download them from a memory stick and the air here got a bit blue - hence the choice of card to show you This card was inspired by one I saw on a blog -  here  and uses some of the last of my Springtime Vintage DSP. I also used Baja Breeze card stock and ink and a touch of Not Quite Navy. The ribbon I used seems to have become invisible - it's some white taffeta wrapped around the DSP with a bow just peeping from under the left hand flower. I also added drops off 3D gloss varnish to the stamens but that has become invisible too!! Got to dash now as it's nearly 6-o-clock and I have my MMM card to make for tomorrow and I have to watch Strictly Come Dancing and X Factor and cook the tea - see you tomorrow - Jacqueline xx

Pastel Pink Christmas

Image
There was much excitement in the Deezines craft room this morning - squeals of delight in fact! A couple of days ago I found out that I was a winner on the St. Luke's challenge blog and look what arrived this morning in the post Well I had to play! This is what I made I used some of the gorgeous papers (My Minds Eye), some glittery chipboard letters (K&Co), Liquid Pearls (Ranger) and a pearly stick pin (Creative Expressions). My stamped image (Polka Doodles) was coloured in using Promarkers. I nicked a swirly stamp off Bev and embossed it with some white embossing powder and the ribbon is some that was tied around the last pack of pre-scored cards that I bought. I am entering this card into two challenges: St Luke's Charity Cards Challenge  - Christmas Polka Doodles  - Swirls and Pearls Thanks so much for looking, bye for now - Jacqueline xx

Less is More - Red and Orange

Image
This week Mandi and Chrissie have challenged us to use the colours Red and Orange over on  Less is More . So this morning - trying to ignore the gloomy weather outside I made a card using my faithful Poppy stamp. I coloured the flowers in using Poppy Parade and Peach Parfait Stampin' Write markers and then did some sponging with a little Tangerine Tango. The sentiment is from the retired set Bird on a Branch. I had a friend helping me this morning - Louis my cat decided to join me but spent most of his time on the window sill watching the birds on the bird table. He also got very excited when he spied a squirrel running down the path You can't see it in this picture but he was muttering very angrily at that squirrel! - bye for now - Jacqueline xx

Colour Challenge

Image
Simply Stampin'  challenge blog have a colour challenge for us this week - take a look I love it when my friend Bev comes around to play as she always has a new stamp set stashed away in her craft bag. This time it was Baroque Motifs so of course I had to have a go with them! Using the colours above I created this card Each of the picture squares measures 2" and when matted onto a slightly bigger piece of card stock fit nicely on to a 5" x 5" square card base. Sorry ladies the sparklies are not Stampin' Up but they matched the Daffodil Delight colour perfectly - hope you don't mind! Thanks for looking, see you soon - Jacqueline xx