Posts

Showing posts with the label New Tutorials

Tutorial Tuesday - To a Wild Rose Penny Slider Card

Image
Today's post is a tutorial on making a Penny Slider card - very easy to do and very effective. Let's go! Gather a few items - card base, coloured and white card stock, inks and a stamp set with large floral images. I used To a Wild Rose. Take your card base and mat and layer coloured and white card stock. Next take a piece of card stock and create a piece to cover at least half of the card front - the wavy line is optional - you can leave it straight if you wish. Now we are going to make a small slot - use a die, punch or do it just by eye but the width must be narrower than your penny. I did mine with a circle punch: punch the holes at the ends of the slot and connect them using a craft knife. Now it's time to do some stamping. Add a background to your card and then make some elements to add to the front of your card and most importantly the things that you want to be able to slide. I want my sentiment to slide and I will also add the bu...

A Forgotten Tutorial

Image
I was cleaning up the Gallery on my phone when I came across some photographs that I took ages ago - before I became a Stampin' Up demo even so you can tell how long ago it was! The photographs were of a Tent Fold card and I had taken them step by step as I made it. The stamps used are walk in the Wild which are sadly retired now - but any set can be used for this technique and I needed to get the photos off my phone so here goes! First take a piece of card stock 2 1/2" x 4 1/2" and score in half down the longest side. Now take a piece of card stock 11 1/2" x 4 1/2" Score down at 1 1/4", 5 3/4" and 10" Crease the folds with a bone folder. Now die cut an aperture in the front of your card using a nesting die. Using the nesting dies create a frame to sit on the aperture. With the largest die used cut a piece of card stock for stamping on. With inks and sponges (or daubers) start to create a backgro...

It's Advent!!!

Image
Happy December 1st - not long to go now and what better way to celebrate the start of Advent than with a little tutorial. This a little card with a wintry scene just perfect for Christmas and uses Stampin' Up inks Soft Sky, Night of Navy and Basic Black - here's how to make it I started with a C6 card base and a piece of white card stock 3 1/2"   x 4 1/2". I cut out a circle and added some dabs of 2 way glue to the back that have been left to dry - this means that the circle can be removed easily after sponging. My circle had been used previously so it looks blue! A pale blue ink was then sponged all around the moon. It doesn't have to go all the way to the bottom but it should go all around the moon. Do not remove the moon. Some copy paper was torn next and used to sponge hills for the background. This was done with a dark blue ink. Add as much scenery as you wish  going a little lighter the further you go back into the distance. ...

One Sheet Wonder - Part 1

Image
This is a technique I was introduced to very early on in my stamping career and I still love it. The one sheet wonder technique is super easy - stamp all over a sheet of paper then cut it up to make your cards - take a look Take a piece of A4 paper and stamp an image repeatedly over the paper. This can be any image - I started off with the 2 step flower from Painted Harvest. The pattern can be  regular or symmetrical or they can be totally random - like mine! This shows the flower with the second lot of stamping on it. Carry on adding stamped images until the sheet of paper is full or you are happy with the pattern. On mine I used all the images in the set and filled the paper with leaves, acorns and dots. On the back of the stamped sheet I drew some lines indicating where I was going to cut my sheet. These can make squares, rectangles and triangles. Try not to make them too small but use all the sheet - scraps can be used in all sorts of ways. This is...

Card Pouch Tutorial

Image
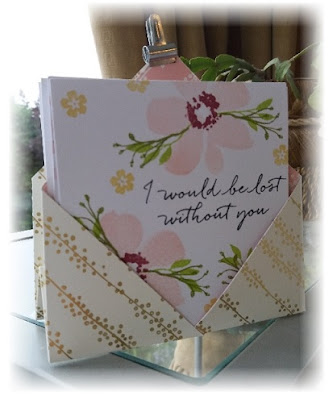
Good evening - and as promised I have the instructions for the little pouch I made for my note cards. It's very easy - take a look Take a piece of decorative paper 9" x 9" square. Fold in half along the diagonal and crease firmly with a bone folder. While the paper is in half score 2" along the diagonal. Score each corner 4" in. Your paper should look like the diagram above and the picture to the left. Fold in the two corners - they will overlap. Remember to crease each fold with the bone folder. Then fold in half. (Ignore the clip at this stage - it was for photographing purposes!!!) Fold the sides down so that an envelope shape forms. Do this for both sides and secure with a clip - like in the picture below. Because of the way it is folded it can be stood up but also can be folded flat to post - it makes a lovely gift. I used Blooms and Wishes to decorate my note cards I hope you like this little...

Climbing Orchid Tutorial

Image
I am so in love with this stamp set and I've been having another play. As I was playing I decided to take some pictures so you could play along too! For this you will need the Climbing Orchid bundle, Whisper White card stock, Rose Red and Crushed Curry ink pads, sponges and a fine tip glue applicator. Choose an orchid from the set and stamp a few on to the Whisper White card stock using the Rose Red ink pad. Using a sponge and the Crushed Curry ink pad sponge the the petals leaving a white space in the middle. Using the dies cut out the petals. Stamp and die cut the middles of the flowers along with a few buds. Using a fine tipped glue applicator make up the flowers. You are now ready to design your card. For my card I used a Smoky Slate background. This had been stamped with the Hardwood background stamp and White Craft ink. I hope you enjoyed my little tutorial - thanks for stopping by. Please leave me a comment and let me know what you think of my ...