Posts

Showing posts with the label Painted Harvest

Retiring Products

Image
We are coming up to the end of the Stampin' Up year and before we get to see the new catalogue we have to clear the way for new stamp sets by retiring the old ones. Not all the items are leaving us - thank goodness but many are including the fabulous Painted Harvest. This has been one of my very favourites and my set is well used. It has great versatility and can be used to create a multitude of projects. I recently did a Facebook Live on this set which you can view  HERE This item along with it's matching leaf punch is available while stocks last - message or leave me a comment for details - thank you - J xx

Three of a Kind

Image
When asked to make some thank you cards recently I immediately reached for the Painted Harvest set. These beautiful blooms lend themselves to quite a few bright colours and here I've used three - take a look: yellow and orange Red and pink Pale and dark blue Ad don't they look good all together? The flowers were fussy cut but the leaves have a lovely punch to make creating these cards a doddle. Thanks for looking today - see you soon - j xx

One Sheet Wonder - Part 4

Image
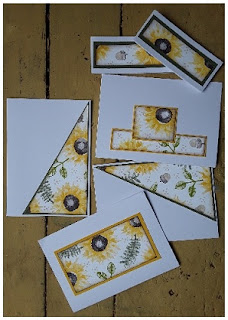
This is the final post with the one sheet wonder - the last of the cards made Just a simple sentiment Large sentiment paired up with a fussy cut flower and punched leaves. Individually cut leaves highlighted with a sequin. Just adding some punched leaves. The one on the left has been just left as it is while the one on the right has just had a flower added. Hope you have enjoyed this mini series of cards and how to make them - hope you come back soon - J xx

One Sheet Wonder - Part 3

Image
Here are some of the finished cards from my Painted Harvest one sheet wonder. Two magnetic bookmarks were made using the long strip that remained down the side after the shapes were cut out. This was also made with left over scraps. Flowers were stamped and cut out and attached using Dimensionals. Leaves were stamped and punched out using the co-ordinating leaf punch. Or cards are simply stamped with a sentiment. The sentiments can also be mounted onto co-ordinating mats. More tomorrow - see you soon - J xx

One Sheet Wonder - Part 2

Image
Yesterday I started a step by step tutorial on creating a one sheet wonder Each piece of cut card was sponged around the edge with Crumb Cake ink - you might just be able to see this in the picture above. The pieces of card were then mounted onto card stock mats. These were in colours that co-ordinated with the ink used in the stamping. These basic cards were then embellished and sentiments added - come back tomorrow to see the finishing touches. See you soon - J xx

Painted Harvest Diamonds

Image
Oh dear - it's been a while. My treatment for my fibro is continuing and it's not exactly been pain free. I was referred to the gym by my dr - I go twice a week and it's tough! Any way enough about me - I managed to fit in a bit of crafting today and I had another play with my Painted Harvest set. The background is So Saffron card stock and it has been stamped with the Hardwood stamp - it's huge it did the whole background in one stamp! It was stamped in Crumb Cake ink which was also sponged around the edge along with some Early Espresso. The diamonds were cut from So Saffron and Crumb Cake card stock - again sponged with Crumb Cake and Early Espresso ink. The Sunflower  - stamped in So Saffron and Crushed Curry ink was attached using Dimensionals. The leaves were stamped in Lemon Lime Twist and Old Olive ink and punched out using the co-ordinating punch. The sentiment is from the Graceful Garden set. This card is being entered into the challenge at C...

Painted Harvest

Image
Painted Harvest is a set that I wasn't going to buy. I don't know why but it just didn't grab me when I first saw it in the Holiday Mini. However - I began seeing what other demonstrators were doing with it and it began to grow on me. So I bought it! Here is my first play with the stamps My card blank was sponged with Soft Sky and Pear Pizzazz ink to create a soft background. I then stamped and fussy cut a couple of the flowers. These are '2 Step' stamping - one stamp is coloured with a pale ink and then a second image is stamped over the top with a darker ink to add detail.  Before the flowers were stuck down I added the dark green fronds. I then stuck down two of the flowers with glue and the third with Dimensionals. The paler leaves are 2 step stamped as well and these are cut out using the matching punch - very quick and extremely easy. The stamp set and punch can be ordered as a Bundle - this saves you some money as it's a little cheaper ...