Posts

Showing posts from September, 2012

Mynnette's DT Call No.1

Image
Mynnette  is creating a new challenge blog and she is having a DT Call. The challenges will be called 'Inkspirational' and we have 4 DT challenges to complete before 30th November! The first is this: We have to CASE Mynnette's card from the above picture - here's my card Yellow and white card stock were used for matting and layering and a piece of the yellow was also run through the Swiss Dots EF in the Cuttlebug. My flower is punched using the Blossom Punch and the leaves are from the 2 Step Bird Punch. One challenge down - three to go, do pop back to see the next one soon! - Bye for now - Jacqueline xx

So Sorry

Image
I should have posted this a while ago but have been dealing with a personal 'thing' for the last 24hrs so I'm sorry if you have visited expecting to find my  52 {Christmas} Card Throwdown  project for this week. It's a special week as it's week 5 - we don't get many of those and so we have a special challenge reserved for these weeks - take a look Take a look at what I have made and then I will explain how I made it.   I've decorated a wooden peg with some scraps of Christmassy paper and then attached some pine fronds which I punched from green card stock. I stamped an image from the Pines and poinsettias set and added some glitter. Finally I punched a bird using the 2 Step Bird Punch and made him into a robin. And that's it - just the thing for clipping together all those Christmas lists and receipts don't you think? Please pop over to the blog - there are some wonderful creations there this week and not one card amongst them! Bye...

Christmas Crafting!

Image
I have a Christmas card to show you today using dies, punches and embossing folders. I've also gone for some very traditional colours - red and green - take a look I used some nesting dies to make my mats and Cherry Cobbler card stock. On to that I layered my Whisper White card stock after I had first run it through my Cuttlebug in my Snowflakes EF - I sponged the edges of the card stock with Chocolate Chip ink. My flowers have been punched with the Boho Blossoms punch along with my leaves which were also punched but using the 2 Step Bird punch. A few golden gems add the finishing touch. I am entering this card into the challenge over at  Christmas Crafting!  where the theme is 'Traditional Christmas Colours'. Thanks for looking - have a great weekend - Jacqueline xx

STAMP SALE!

If you pop up to my tabs bar you will find a link to my  *STAMP SALE*  if you like the look of any, click on the 'Buy Now' Pay pal button and I will get one in the post to you. Postage is FREE and these stamps will only be available for a limited period - keep checking though 'cos I might be adding some more over the weekend! Jacqueline xx

French Foliage and Scallops

Image
The challenge this week at  DYSU Challenge Blog  is Rather an interesting photo don't you think? I also thought I'd combine this challenge with the colours that are this week's  Dynamic Duos I already had my French Foliage set out on my work top so I decided to go with it and here is my card I used Certain Celery and Always Artichoke card stock along with my scallop edge punch to create some little panels which were placed under a Certain Celery mat - this was attached using some 3D foam pads. I cut a slightly smaller white panel on to which I added my leaves - stamped in Always Artichoke and Certain Celery ink. I then found a scrap of linen thread to tie around. My little 'thank you' sentiment is from Just Believe. I had great fun creating this card - hope you like it - bye for now - Jacqueline xx

Freshly Made Sketches

Image
Freshly Made Sketches How great is this sketch? I fell in love with it the moment I saw it and thought it was the perfect opportunity to use my gorgeous new SU Blossom Punch - take a look I have used some of my Timeless Portrait DSP along with my favourite colour card stock Cherry Cobbler. My smaller flowers are made using the Boho Blossoms Punch and Island Indigo card stock with a jewelled brad in the centre. My sentiment is from the 'My Friend' stamp set. Just hope I can find a suitable envelope for this creation as some of my elements are off the page - I thought it was a good idea at the time!! The link to the challenge is under the sketch, bye for now - Jacqueline xx

Addicted to Spring

Image
At first I wondered at Kylie's sanity - Spring cards in September????? But then I realised that where Kylie is it is Spring 'cos Kylie lives in Australia and while we are being plunged into dark evenings, wet leaves and frosty mornings, Down Under it is getting warmer................do you have any spare rooms Kylie? Anyway - back to my card. Of course the challenge is  Addicted to Stamps   and here is my card for our third Theme challenge 'SPRING' I went with a zingy fresh green to stamp my leaves - a mish mash of sets, there's little leaves from Pocket Silhouettes, Big leaves from My Friend and tall elegant leaves from Just Believe. My flowers have been punched using a bright yellow and the sentiment has been stamped in a matching ink. A few pearls add a finishing touch. Don't forget to pop over to take a look at all the other dt cards on the blog, they are as always gorgeous. Thanks for looking today - it's great to have your company - ...

Poppies and Teasels

Image
Hello all - we are now no longer an island - the floods have disappeared and we can now see land around us! Actually it wasn't that bad and we were only marooned for a day! As you know I had to close my web shop recently due to some technical problems and I have had some digis for sale in my side bar for a while, and now - for a limited time only I have made my two most popular clear stamps into digis Poppies Teasels Here is what you can do with them More ideas can be found by clicking 'My Stamp Designs' and 'Deezines Digiz' in my labels list. All my digis cost less than a pound but don't forget they are only there for a limited time - bye for now - Jacqueline xx

Mojo Monday - Round or Square?

Image
Mojo Monday To my square card base I added some DSP from the Just Add Cake collection along with some Cherry Cobbler - I really do think that this is my most favourite Stampin' Up colour!! A panel of Basic Black was also added. To my round Vanilla circle I added some stamped images: my leaves are from French Foliage and are stamped in Wild Wasbi ink. The Cherry Cobbler flowers are from Everything Eleanor (another favourite). Finally I added a black silk bow and some flat backed black gems. That's all for tonight - click the link under the sketch to check out the challenge and I will see you again soon. Bye for now - Jacqueline xx 

Less is More Challenge

Image
So the ladies at  Less is More  this week want us to - 'Take Three Challenges' - we go back to the archives and choose 3 past challenges, combine them and make a card. I chose Week 1 - Black, Pink & White Week 2 - Flower or Tree Week 12 - Off Centre Here is my card I started off with a 5" x 5" white card base and I have used the Fabulous Florets stamp set from Stampin' Up. I have stamped my leaves in black ink and my flower in pink - Pretty in Pink actually! My flower has been attached using 3D foam pads - here is a close up Hope the weather is better with you that with me at the moment - we are marooned at the top of our hill, there's floods at both ends of our lane so we are not going anywhere for a while! Will just have to stay in and craft instead! Thanks for looking - see you soon - Jacqueline xx

MMM - Vintage Travel

Image
This is the last week of our Vintage themed challenges at Make My Monday  and we are finishing with VINTAGE TRAVEL Here is my card My card is made using some K&Co paper (I forget which collection) and I have gone for a bit of nautical travel. I started with a 5" x 5" square card with a mat of pale blue card stock. Over that I have layered some of the papers, I cut out various pieces of interest and added them with 3D foams pads along with my words of travel. All my edges were sponged with Distress Ink before sticking down. Please pop over and say hi to the other ladies of the dt and take a look at their amazing creations too - bye for now - Jacqueline xx

Triple Time Stamped CASE.

Image
I saw  THIS  card last week on  Ruth's  blog and just had to have a go. I love Ruth's cards, not only are they beautifully designed and made - she always decorates the inside and makes a matching envelope. On Ruth's blog there is also a link to a video on how to make a card like this The Triple Time Stamped card is made by stamping on three panels of card and mounting them on to card stock mats - it's easier if you watch the video and I just tell you what I used to make my card! Card stock is Taken with Teal and my stamped panels are Whisper White. My swirls are from Everything Eleanor and are stamped with Crumb Cake ink. I stamped the flowers in Tempting Turquoise and they are from the Fabulous Florets set.  Before sticking down the middle two panels I added some white organza ribbon and a blue button and bow. We cleaned our chimney today ready for when winter comes although judging by the weather we have had today I'm sure it won't be long...

Pocket Card Tutorial Ready

Image
As promised my tutorial on how to make this card - - is now up on my Craft Club Blog  HERE . We made made these at my workshop last Thursday night and here is the one I made during the demonstration I've used some Really Rust card stock and various autumnal coloured inks - I also sponged around the edges of my Vanilla card stock with a bit of Crumb Cake ink too, - Chocolate Chip was used for the tags. My French Foliage set was used for the stamping and I also used my Scallop Edge punch for my middle border. This is such an easy card to make - one piece of card stock, one cut, about six folds - and no measuring!- It takes no time at all to make - all the fun is in the decoration, hope you have time to have a go! Bye for now - Jacqueline xx

Add an Eyelet at 52 {Christmas} Card Throwdown

Image
Yes that's right folks dig out those teeny tiny little round things with holes and add them to a Christmas Card! We want to see some ....... Here is my card I have used some Basic Black and Cherry Cobbler card stock along with some Stampin' Up DSP. My stockings are stamped using a very ancient stamp from my stash, coloured with a Stampin' Write marker in Poppy Parade, cut out and hung from some silk ribbon threaded through my eyelets. Here is a close up The girls on the dt have some wonderful creations to share with you this week so please make sure you find the time to pop over to  52 {Christmas} Card Throwdown  and take a look - bye for now - Jacqueline xx
Yikes - I've fallen behind!

Image
I've recently changed my job description in regards to some local committee work that I do and I handed a huge chunk of paperwork over to a new colleague. Yippee I thought - I will now have more time to get my crafting commitments done on time ..........I've just realised that I should have posted about 12 hours ago the fact that  Addicted to Stamps  has a new  Scrapbook Challenge ! Oh dear. Our subject this month has been picked by the lovely  Karen  and is AUTUMN here is my page My page is some 12" x 12" paper (sorry can't remember where from) with a strip of patterned paper added to the top. I have decorated it with cut out leaves stamped from my French Foliage set in loads of autumnal coloured ink. My title is also stamped and cut out. I added some Very Vanilla card stock in the middle but added my photo digitally. It's one of my most favourite pics but I only have it stored on my computer and my printer does not do colour. What I shall do ...

A Blushing Butterfly

Image
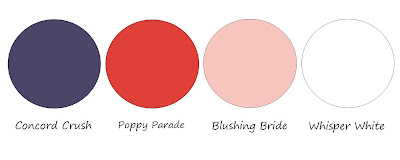
I have a challenge card for you today - for two challenges in fact, a colour themed challenge and a sketch - take a look Simply Stampin' and retro sketches I found the colour combo a little strange at first (sorry ladies) but actually I'm really pleased with the end result. Here it is I've used two stamp sets: Simply Said (Poppy Parade stamped flower) and Precious Butterflies (Concord Crush stamped sentiment) - also used my very useful Butterfly Punch and Scallop Edge Punch. I have taken a leaf out of my friend  Mynnette's  book and added loads of  crystal bling! Feeling a little blue today - Briony (my daughter) returned to uni today, she left the house in total uproar as she only finished her packing minutes before she left! We were going to go with her but a friend offered to go and help out with transporting all her stuff and the unpacking - she didn't want us after that!! Thanks for looking, see you soon - Jacqueline x...

Bingo!

Image
Yay - it's Bingo card time at  Addicted to Stamps  - take a look I chose the bottom line - Circle, Ribbon and Purple - and made this Now you might be forgiven for thinking that this doesn't look like much but by just gently tugging at the white ribbon each circle will pull round and out telescopically - like this The two bottom circles are actually an easel card and the telescoping circles have been attached with a brad. My circles are die cut (to make a round easel card: fold some card stock, lay the die on the card stock with a small section of the fold just inside the die, this will ensure that the circles are joined. Fold one of the circles in half towards the join and then cut another single circle. With the folded circle uppermost and the fold horizontal, attach the single circle to the bottom half and then decorate). I used my Fabulous Florets stamp set and colours - Old Olive, Wisteria Wonder and Concord Crush. Each of my circles has been att...

Vintage Childhood

Image
It's  Make My Monday  time and we are continuing our monthly vintage theme with a Vintage Childhood challenge - here is my card I have used a Shabby Chic image from a Debbi Moore CDRom and coloured it with Promarkers. Other elements added are a doily, some seam binding ribbon, paper punched flowers and Liquid Pearls. I also inked all my edges with Brushed Corduroy Distress Ink. Please make some time to pop over to the blog to take a look at all the fabulous work produced by the dt and I will see you soon - Jacqueline xx

Gifts of the Season

Image
This is the new challenge this week at  52CCT  - and here is my card It's a pop-up card - two trees with a huge pile of pressies in between. Here's a close up I have used loads of Stampin' Up DSP scraps along with a generous amount of Cherry Cobbler card stock (my favourite). At this point you may be thinking that this is just the inside - where is the outside? Well some idiot forgot to photograph the outside of their card and it is now somewhere in my craft room - hiding! Probably under the piles of stuff I had to move in order to sort out my interweb router this morning. However if you hop on over to the  challenge  there will be more Christmassy things for you to see there made by my lovely team mates - have a great weekend and I will see you soon - Jacqueline xx

The Sky's The Limit

Image
Another balloon card today (I love these stamps) and another challenge this time it's  CASology Isn't it funny how sometimes you get a great idea for a card but the finished article is nothing like what you imagined? That's just what happened with this card I won't bore you with too many details but in my head it should have been a lot brighter and I was going to sponge all my edges - doh! I am however pleased with my embossing and you can actually see it on my photograph! I used some Anna Griffin paper, Up, Up and Away stamp set and Tangerine Tango, Island Indigo and Chocolate Chip inks. The balloon and clouds have been popped up on 3D foam pads. Thanks for stopping by and taking a look - Jacqueline xx

Key Chain Mini Albums.

Image
Take a look at these photos and see if you can guess what I have recycled to make my mini album Well it's actually a chewing gum box! After the contents were consumed I carefully took it apart and re-covered it with some decorative papers (this is a great way of using up scraps). I then die cut some tag shapes and covered them using matching paper and adding a few flat embellishment too. This is a great little project to do and one I shared with some ladies who came along one day last week to a workshop. Here is the one I made in the demonstration It was so lovely yesterday when one of the ladies who had made this showed me the one she had finished making already decorated with pictures of her beautiful Granddaughter - don't you just love it when a plan comes together! - bye for now - Jacqueline xx