Posts

Showing posts from July, 2019

Above The Clouds - Shaker Card

Image
I have a card to show you today that I absolutely loved making - take a look It's a Shaker Card using Above the Clouds. Over the years Stampin' Up have had some lovely balloon stamps but I do believe that this one is the best! Pool Party card stock was used for the background and the clouds were stamped and embossed with white embossing powder. I cut a frame onto which I stamped my sentiment. I then added 3D foam tape to my background to fit my card stock frame. I think a couple of layers of tape is a good idea as you want enough room for your shaky bits to - well - shake!! Acetate was placed on the back of the frame and wiped over with an Embossing Buddy to remove the static. Teeny tiny balls were added into the foam tape frame and then the acetate frame was placed on top. The frame was then decorated with the balloons - stamped using last year's In Colours: Blueberry Bushel, Lovely Lipstick, Grapefruit Grove, Call Me Clover and Pineapple Punch. They were

Nice and Nautical

Image
I have another challenge card for you today. I am joining in the challenge over at Freshly Made Sketches And here is my card I have used my new Sailing Home Bundle isn't it gorgeous? I love anything to do with the sea and this set has ships, anchors, lighthouse,compass and rope - perfect for those hard to make masculine cards! So, I stamped my lighthouse and die cut it. The seaweed was die cut from some of my Perennial Essence DSP and the anchor from some copper foil card stock. The background was sponged with Bermuda Bay ink. All products can be ordered from my online shop - see links above. I seem to be burning the candle at both ends lately: get up early for work, get home early afternoon to catch up on housework etc, get mum settled for the night and then craft till my eyes close! I even managed to fit in some gardening today too! It makes me really happy though as I can remember a time when there was nothing but despair and I didn't

Inspiring Iris Sympathy Card

Image
it's not nice to have to make sympathy cards and they are often needed at short notice so I try to have a couple in my stash for when the need arises. I have made a simple sympathy card using the set Inspiring Iris although the image I have used is not the iris but the carnation - take a look I have used the sketch from this week's challenge over at CAS Colours & Sketches My two rectangular panels have been masked and then sponged with Soft Sea Foam ink. My flower has been stamped with Old Olive and Lovely Lipstick. Short and sweet today as it's still very hot here and I'm exhausted! The shop where I work has poor air conditioning so it's extremely hot behind the counter and I had some particularly rude customers today. I managed to plod home though and flop down on the sofa for a rest before seeing to tea and my mum! Thanks for stopping by today - J xx

Magnolia Lane Follow Up

Image
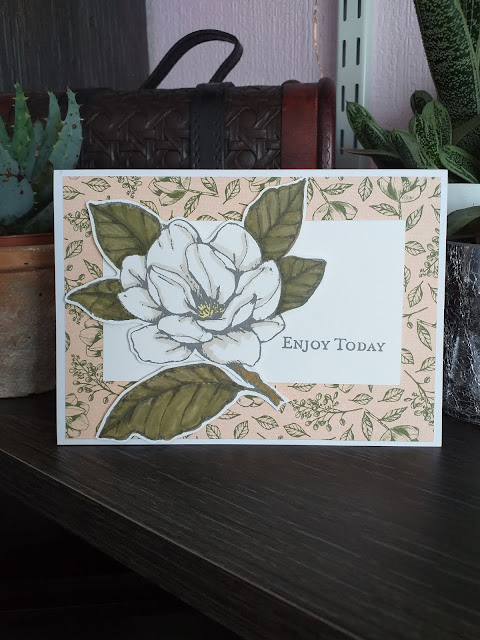
Whew - it's been unbearably hot here today but I am sitting at my desk now with a newly purchased mini fan. So feeling much cooler now I can show you a couple of things made with the Magnolia Lane DSP. First I made a card - I do love this large image from the Good Morning Magnolia stamp set and it's perfect for colouring in with the Blends (Old Olive: dark and light, Crumb Cake light, Soft Suede dark and Daffodil Delight light). This is a lovely simple card with a basic panel cut from the DSP, white card stock matted on top with the sentiment and the cut out image on top of that. Although there's layers it's very flat as no Dimensionals were used. Next I made a gift bag - So the same DSP was used so that the card and bag match and the closure was made with one of the dies from the Stitched Nested Labels. Another image from the Good Morning Magnolia set was used to decorate it and I found a little peg in my stash to anchor it. Thanks

SU Spotlight - Magnolia Lane DSP

Image
There are some really lovely speciality papers in the current Stampin' Up catalogue. I have fallen for the Magnolia Lane DSP - take a look at these My photos make it look like they are A4 but they are 12" x 12" and there are 12 sheets in total Pop back tomorrow to see some projects created using this gorgeous paper. Bye for now - J xx

Mix it up Monday - Varied Vases

Image
Hello - we're mixing it up this Monday and using a stamp set in a different way to how you'd expect it to be used. I've taken the Varied Vases stamp set And I've just used the flower stems to create a meadow scene - take a look Before stamping I sponged the card stock with green and blue ink. The bottom of the flower stems also make very good grass stems! The blossom was heat embossed using white embossing powder with a pink marker to add the centres. I love the sentiment too - it can be used for a variety of occasions and finishes off the card perfectly. This stamp set comes with it's own co-ordinating paper punch plus there's another stamp set available now that co-ordinates beautifully with this I can't wait to get my hands on it and have a play! All the above products can be ordered through my online shop - see the top tabs for details or contact me direct. Thanks for looking today - see you soon - J xx

Challenge Time!

Image
I think I'm just in time to take part in this week's challenge over at Freshly Made Sketches So to make my card I used some new stash - yes new stash!! I used the Daisy Lane Bundle. A stamp set and matching punch. It's the medium daisy punch included in the bundle and the larger punch is sold separately. By purchasing the bundle you save 10% on the price of the products. Contact me for details on purchasing and this month's Hostess Code. Now to my card I've used a very limited palette for this card: Soft Sea Foam for the leaves, Basic Gray for the flowers and yellow for the centres. Now it's way past my bedtime to I'll bid you goodnight and see you soon. Thanks for stopping by - J xx

A Forgotten Tutorial

Image
I was cleaning up the Gallery on my phone when I came across some photographs that I took ages ago - before I became a Stampin' Up demo even so you can tell how long ago it was! The photographs were of a Tent Fold card and I had taken them step by step as I made it. The stamps used are walk in the Wild which are sadly retired now - but any set can be used for this technique and I needed to get the photos off my phone so here goes! First take a piece of card stock 2 1/2" x 4 1/2" and score in half down the longest side. Now take a piece of card stock 11 1/2" x 4 1/2" Score down at 1 1/4", 5 3/4" and 10" Crease the folds with a bone folder. Now die cut an aperture in the front of your card using a nesting die. Using the nesting dies create a frame to sit on the aperture. With the largest die used cut a piece of card stock for stamping on. With inks and sponges (or daubers) start to create a backgro

Challenge Reminder

Image
This is a little reminder of the challenge over at the  Rainbow Card Challenge It would be fab to see you over there. All you have to do is create a card using the colour BLUE. Here is a bit of inspiration for you This is a card I created a while ago with some stamps made using my own designs. I love silhouettes and using the blue this card has a midnight in winter feel about it. Frosty seed heads and a full Midwinter moon! The background is made by punching a circle from a post it note and placing on the card base. Dark blue ink is then brayered over the whole card leaving the middle around the moon paler than the outsides. The edges of the card are sponged with the same ink but you could also use black to go darker still. The seed heads were then added in blue and black ink. The teasels were stamped twice before re- inking to give a feel of perspective. Finally the spindly seed heads were stamped and embossed with white embossing powder. Thanks

Pink and Silver Floral Essence

Image
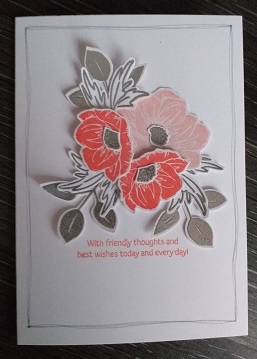
I really loved my black and white Floral Essence card but I also wanted to do one in colour. The colour I chose were pink and silver - take a look The flowers were stamped in Blushing Bride and Flirty Flamingo. The leaves were stamped and embossed with silver embossing powder. The lighter flower and the foliage was glued onto the card base with Tombow which is a wet glue while the remaining two flowers were added with Dimensionals. Here's a close up All of the products used can be purchased from and delivered to your door (p+p £4.95) so please let me know if you like to place an order. Alternatively you could order through my online shop HERE Don't forget that for every £45 spent you earn £4.50 to spend in August. If you are placing an order for £25 or more please use the Hostess Code G6VTTK3C You will then receive a little thank you gift from me. Thanks for dropping by today - see you soon - J xx

Time for a Challenge

Image
I haven't done a challenge for a while so this morning I had a browse on my tablet and found  Freshly Made Sketches And here is the sketch A lovely simple sketch you might think - oh my goodness did I struggle with this one! I knew what I wanted to do but when it came to it - it just looked too cluttered. So I simplified it and this is how it turned out - take a look So - let me introduce you to Good Morning Magnolia - one of my new favourites (I know I say that about every stamp set!!) The central image is just stunning and perfect for colouring in with the blends. I stamped my image using Basic Gray and then coloured it with Old Olive, Crumb Cake, Soft Suede and daffodil Delight Blends. I then cut it out. Why didn't I buy the matching dies - because I like to fussy cut (or maybe it was because I placed my order for it after midnight and chose the wrong item. Note to self - don't place orders when half asleep!!) I used some of the Mag

Black and White Floral Essence

Image
Floral Essence has got to be one of my new favourites. Quite simply - I love it! Today's card shows it off beautifully in black and white - take a look One of the crafters I love is Narelle Farrugia. Her cards are stunning and this card although is not a direct copy certainly looks very similar. To take a look at Narelle's beautiful card please click HERE Here's a close up of my card Not many products used on this card - just the stamps and black ink! Thank you for stopping by today - hope you liked my card. See you soon - J xx