
Fancy Fold Bridge Card Tutorial
Today's card is a Bridge Card - I would also like to share with you how I made it. Here is a small tutorial.


A sentiment was added to finish off the card.
This card is being entered into the challenge over at
Make My Monday
Fancy Folds.
Thanks for stopping by today - see you soon - J xx

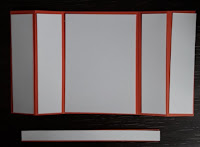
I took a piece of coloured card sock and scored it into three equal sections. The two outside sections were also scored down the middle - all were creased with a bone folder. White card stock was cut to fit each section.

The images from Climbing Orchid were stamped, coloured, die cut and assembled. A branch from Seasonal Layers was also die cut.

The white card stock was stamped with the Hardwood stamp and the edges sponged.
This was done with Crumb Cake ink and Early Espresso.
The pieces were stuck down.

The orchid images were arranged and stuck down.
A piece of card stock was attached to the card which enables the card to stand up. The strip is the length of the card when one of the side panels has been folded in. This means that it folds flat for posting.

More orchids were assembled to decorate the side panels.

A sentiment was added to finish off the card.
This card is being entered into the challenge over at
Make My Monday
Fancy Folds.
Thanks for stopping by today - see you soon - J xx


A lovely card and a great tutorial! Thanks for joining us at Make My Monday.
ReplyDeleteBeautiful card, brilliant step by step. Thank you for joining us at Make My Monday. Emma
ReplyDelete